If you maintain a fork of an open-source project while adding your own customizations, you inevitably face a common challenge: How to Add updates from the original repository into our customized fork without losing our own changes? This guide walks you through the essential workflow using Git’s powerful remote management features.
Understanding the Remote Setup
When you fork a repository on platforms like GitHub or GitLab, you typically have one remote called origin pointing to your fork. To track the original project, you need to add what’s commonly called an upstream remote. Lets consider you have a nextcloud customized client and you want to update the official changes to your customized client repo without loosing your changes.
# View your current remotes
git remote -v

# Add the original repository as upstream
git remote add upstream https://github.com/nextcloud/ios.git
After running these commands, your remote configuration should look something like this:
origin    https://github.com/your-username/nextcloud-ios-fork (fetch)
origin    https://github.com/your-username/nextcloud-ios-fork (push)
upstream  https://github.com/nextcloud/ios (fetch)
upstream  https://github.com/nextcloud/ios (push)
Notice you now have two remotes: origin (your fork) and upstream (the original project).
Fetching Updates from the Source
Before you can merge updates, you need to fetch them:
# Get the latest changes from upstream
git fetch upstream
This downloads all branches and tags from the original repository without modifying your local working directory.
Finding the Right Branch or Tag
NextCloud iOS typically uses tags for releases rather than branches. You need to identify which version you want to update to:
# List all remote branches
git branch -r

# NextCloud uses tags for releases, so search for stable tags
git tag | grep stable

# Fetch all tags from upstream
git fetch upstream --tags
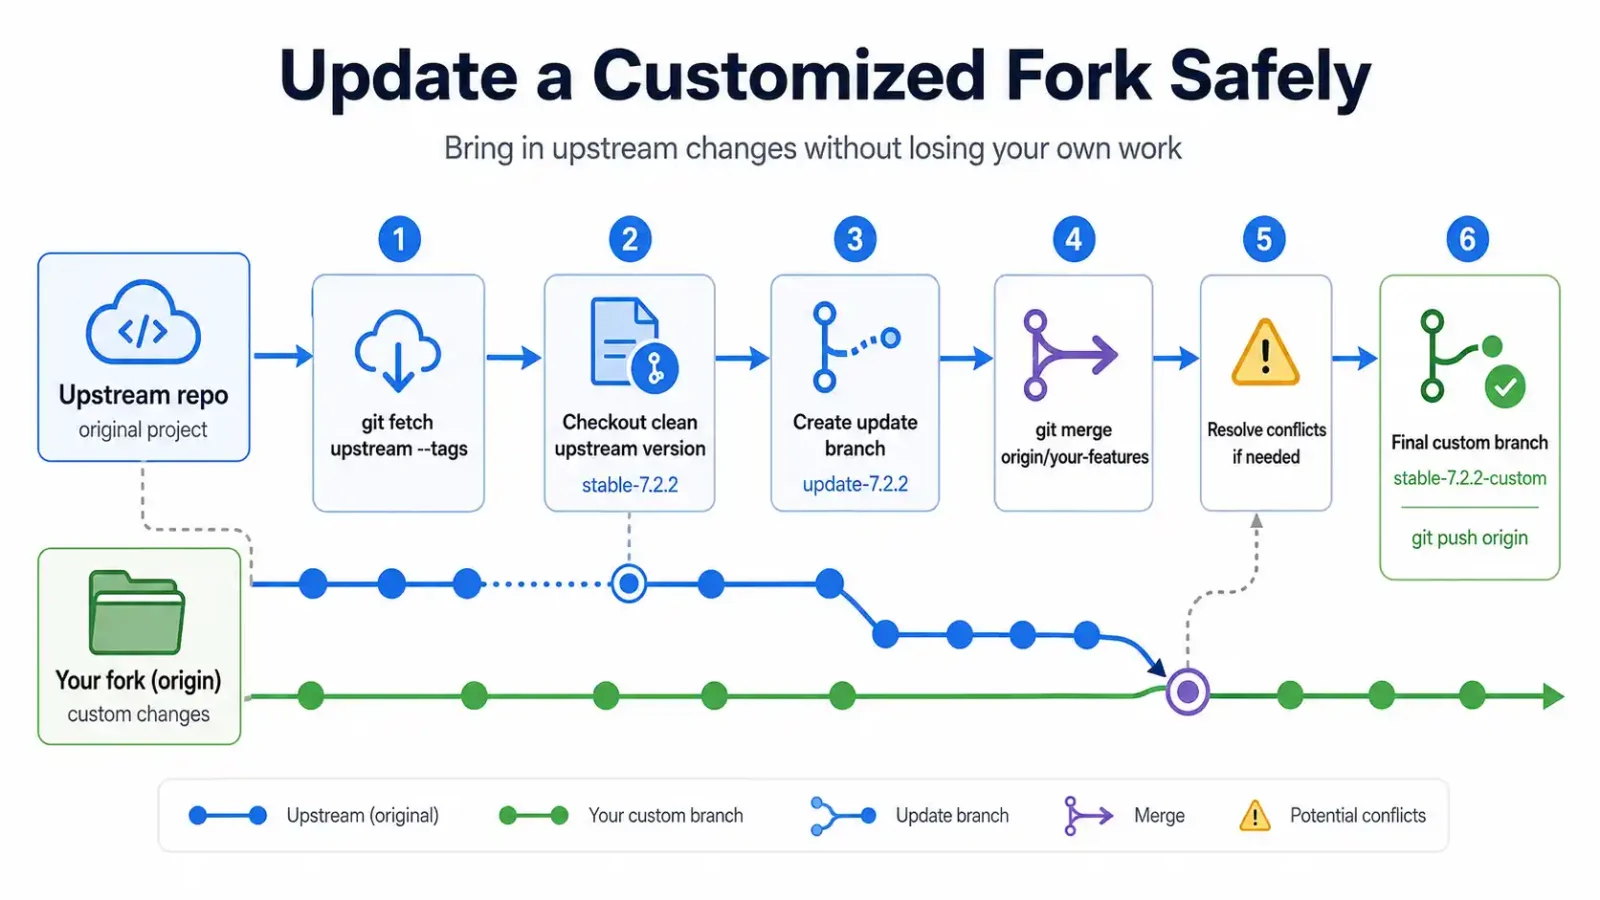
The Safe Merge Strategy
Here’s the core workflow that protects both the upstream changes and your customizations:
- Start from a clean upstream tag or branch
git checkout upstream/stable-7.2.2
# or if it's a tag:
git checkout tags/stable-7.2.2
- Create a temporary working branch
git switch -c update-7.2.2
This branch (update-7.2.2) now contains the pristine upstream code at version 7.2.2.
- Merge your customizations onto this clean base
git merge origin/your-custom-branch
This is the crucial step: you’re merging your fork’s custom branch onto the updated upstream code. Git will attempt to combine changes automatically, but you may need to resolve conflicts if both sides modified the same files.
Resolving Conflicts
When conflicts occur during the merge:
- Open the conflicted files in your editor
- Look for the
<<<<<<<,=======, and>>>>>>>markers - Decide which changes to keep (often you’ll want a combination of both)
- Remove the conflict markers once resolved
- Add the resolved files:
git add <filename> - Complete the merge:
git commit
Finalizing the Update
Once merged successfully:
# Create your new version branch
git branch stable-7.2.2-custom
git checkout stable-7.2.2-custom

# Push to your fork
git push origin stable-7.2.2-custom
Why This Workflow Works
The key insight here is the direction of the merge: you’re merging your changes onto the updated upstream base, not the other way around. This approach:
- Preserves the upstream project’s commit history intact
- Applies your modifications as a discrete set of changes on top
- Makes future updates easier since Git understands the merge relationship
- Keeps your custom branch structure organized
Best Practices
- Regular updates: Don’t let your fork drift too far from upstream—smaller merges are easier to resolve
- Commit messages: Document what customizations you’re preserving and why
- Testing: Always test the merged result before pushing to production
- Branch naming: Use clear naming conventions like
update-[version]for temporary branches and[version]-customfor final results - Check NextCloud’s release schedule: NextCloud typically releases updates regularly, so plan your merges accordingly
Example Complete Workflow
# Add upstream if not already added
git remote add upstream https://github.com/nextcloud/ios.git

# Fetch latest from upstream
git fetch upstream --tags

# Checkout the stable version you want
git checkout tags/stable-7.2.2

# Create update branch
git switch -c update-7.2.2

# Merge your custom branch
git merge origin/your-features

# Resolve any conflicts, then commit

# Create final branch
git switch -c stable-7.2.2-custom

# Push to your fork
git push origin stable-7.2.2-custom
This workflow transforms a potentially painful manual update process into a manageable, repeatable procedure. By leveraging Git’s remote tracking and merge capabilities, you can maintain a living fork that benefits from both upstream improvements and your own customizations.
Remember: the goal isn’t just to merge code, but to maintain a sustainable relationship with the upstream project while preserving the value you’ve added to your fork.